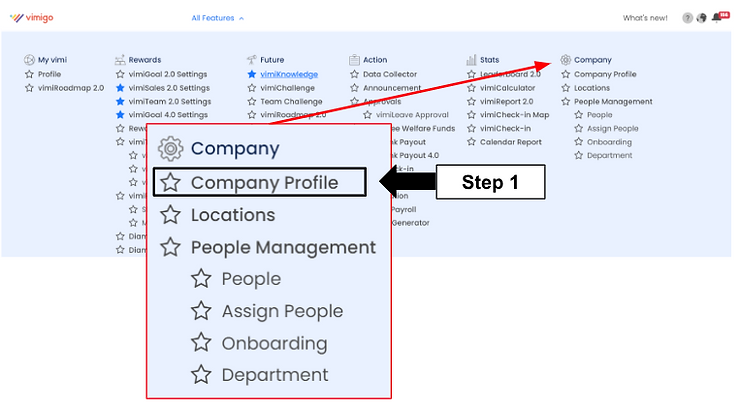
Company
Your company's control panel in vimigo - profile, branding, modules, and the settings every other feature reads from.
What is it?
The Company module is the foundation of your vimigo workspace. Every other feature - vimiGoal, vimiSales, vimiLeave, vimiCheckin, diamonds, leaderboards - reads its configuration from here.
Think of it as four things in one place:
- Your company profile: legal name, display name, email, address, vision, mission, and "About Us" story.
- Your settings: the master toggles that control how goals, sales, leaves, and rewards behave for everyone.
- Your module control: the on/off switches for each vimigo feature, company-wide or per department.
- Your branding: replace the default vimigo logo, colors, and app title with your own (white-label).
If something anywhere in vimigo seems off - a module missing from an employee's menu, sales totals not showing, the wrong currency displaying - Company settings are the first place to check.
Quick Start
If your company was just created, do these in order:
- Log in as Management User and open Admin Panel.
- Go to "Companies", find your company, and click "Edit".
- Fill in "Company Name", "Email", "Address", "Vision", and "Mission". Click "Update".
- Go to App Settings > "Module Control" and turn on the features you need (vimiLeave, vimiCheckin, vimiGoal, etc.).
- (Optional) Upload your logo under "Company White Label Set" so employees see your brand.
After this, your company profile is live and the rest of the product has the context it needs.
For Admins (Employer / HR / Manager)
How to complete your company profile
- Go to Admin Panel > "Companies" > click "Edit" on your company.
- Fill in the identity fields:
- "Company Name" - your registered legal name, e.g. "Damai Retail Sdn Bhd".
- "Company Display Name" - short brand name shown in the app header, e.g. "Damai".
- "Email" - main contact email. Must be unique across all vimigo accounts.
- "Phone", "Fax", "Website" - company contact details.
- Fill in the address: "Address", "Postcode", "City", "State", "Country".
- Set the "Contact Person" and "Contact Person Number" for the primary PIC.
- Pick your app language (English, 中文, or Bahasa Melayu).
- Click "Update".
Tip: The "Company Name" and "Registration Number" are locked down to super-admin edits in some plans. If you can't change them, email vimigo support.
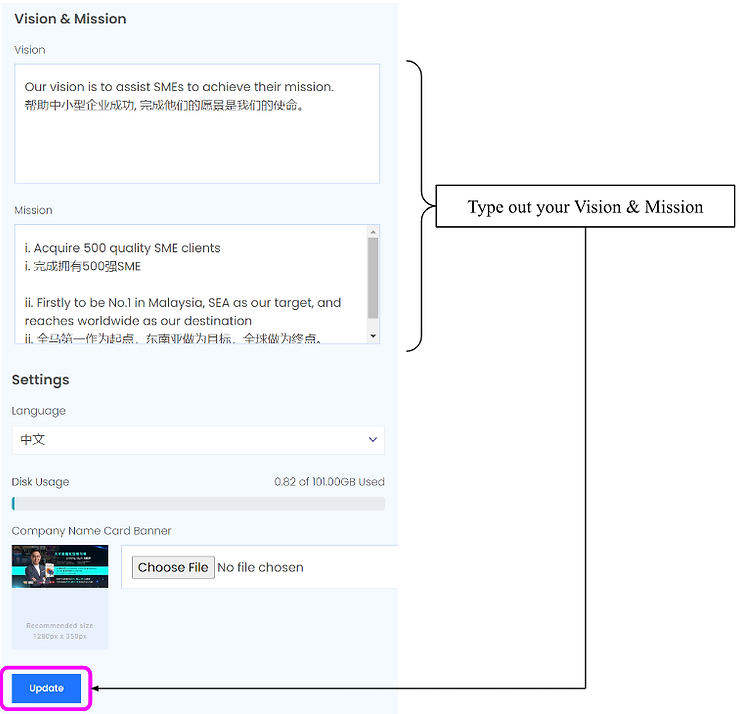
How to set your Vision and Mission
Your vision and mission appear in every employee's app, usually on the company "About Us" screen.
- Admin Panel > "Companies" > "Edit".
- Scroll to "Vision" and "Mission" (each accepts up to 2,000 characters).
- Enter each statement in plain English. For example:
Vision: To be Malaysia's most trusted neighbourhood grocer by 2030.Mission: Serve every customer with fresh produce, fair prices, and genuine warmth.
- Click "Update".
- Employees will see the updated values next time they open the app. If they don't see changes, ask them to log out and log back in - profile data is cached on login.
How to configure company settings
The "Company Settings" panel holds every behavior toggle for the product. Common ones to set on day one:
- Open App Settings > "Company Settings".
- Under General, decide:
- "Allow staff and Manager to update Display Name" - turn ON if employees can edit their own display names.
- "Notify everyone when someone receives a diamond award for public recognition" - turn ON for a more social feel.
- "Determine employee calendar view" - choose "Department Only" or "All Employees" for the leave calendar.
- Under vimiGoal, set "Minimum vimiGoal Requirement (%)" and "Median vimiGoal Requirement (%)". These define the reward tiers - e.g. 50% minimum, 80% median means employees need at least 50% goal achievement for the base reward and 80% for the bonus tier.
- Under vimiSales, set "Management" (days Management can update entries after the period ends) and "Non-Management" (same but for staff).
- Under vimiBank, set "vimiBank A Release Date" (e.g. day 1 of the month) and "vimiBank B Release Date" (e.g. day 15).
- Click "Save" or "Update" on each section.
Warning: EWF wallet percentages (Education, Travel, Food, Housing, etc.) must sum to exactly 100. If they don't, distribution will behave unpredictably.
How to enable modules for your company
Module Control is the master switch for each feature. If vimiLeave is off, nobody sees leaves - not even management users.
- Open App Settings > "Module Control".
- For each module ("vimiLeave", "vimiCheck-In", "vimiReview", "vimiRewards", "Bifrost Integrations", etc.), toggle ON or OFF.
- To scope a module to specific departments, click the "Department" selector for that module and tick the departments that should have access. Leave it as "All Departments" for company-wide access.
- Click "Save".
Example: You want vimiLeave for everyone but vimiReview only for the Sales department.
Module: vimiLeave          → All Departments
Module: vimiReview         → Sales
Module: vimiCheck-In       → All Departments
Tip: When you add a new department later, it's automatically enrolled in any module that already had all existing departments enabled. This prevents new teams from missing out silently.
How to configure white-label branding
Replace vimigo's default branding with your own logo, color, and app title.
- Admin Panel > "Companies" > "Edit" > "White Label Set" in the side menu.
- Fill in:
- "Application Title" - the text shown in the browser tab and top of the app. Example: "Damai HQ".
- "Sidebar Logo" - 180×60 px PNG or JPG with transparent background. Click the slot to upload.
- "Sidebar Mini Logo" - 40×40 px, icon-only version for the collapsed sidebar.
- "Sidebar Logo (Black)" - 180×60 px, version for dark backgrounds.
- "Favicon Logo" - 96×96 px PNG for the browser tab icon.
- "Main Color" - hex code for your brand color, e.g.
#1A73E8. Used for buttons, active states, and highlights.
- Click "Submit" to save.
- To reset a single logo, click the red trash icon beside it. To reset everything back to vimigo defaults, click "Restore All" and confirm.
Warning: "Restore All" is not reversible through the UI - you'll have to re-upload your logos if you regret it.
How to generate or regenerate the API key
The API key lets external systems (a CRM, a custom dashboard, Bifrost automations) talk to vimigo.
- Open App Settings > "API Key".
- If no key exists, click "Generate".
- If a key already exists and you want to rotate it (e.g. you suspect it leaked), click "Regenerate".
- Copy the key and hand it to your integration team. Store it in a password manager - vimigo does not show it again after you leave the page.
Warning: Regenerating immediately invalidates the old key. Every external system using the old key will fail until you update them with the new one.
How to set up Bifrost integrations
Bifrost is vimigo's built-in automation platform. It sends data to external systems (CRMs, webhooks, HRMSs) when events happen inside vimigo.
- Make sure "Bifrost Integrations" is enabled in "Module Control".
- Open App Settings > "Integration" > "Bifrost".
- Click "Create Action" and fill in:
- "Name" - short label, e.g. "Notify CRM on Goal Complete".
- "Trigger Event" - pick from
goal_completed,leave_approved,checkin,review_submitted, etc. - "Endpoint URL" - the external URL to POST to.
- "Headers" - optional auth headers like
X-API-Key: your-key.
- Set "Status" to Active.
- Create a Mapping to define how vimigo fields map to the external payload.
- Create a Trigger to bind the Action + Mapping to the event.
- Test by completing a goal - check your destination for the webhook.
For Employees
Employees don't configure Company settings. What they see is shaped by management users:
- Vision and Mission - shown in the "About Us" screen when
module_about_usis enabled. - Company logo and app title - visible throughout the app if management users set up white-label.
- Menu items - only modules that management users enabled for their department appear.
To view the company profile: open the app > side menu > "About Us" (if available).
Settings & Configuration
| Setting | What it does | Default | Where |
|---|---|---|---|
| "Minimum vimiGoal Requirement (%)" | Base reward threshold for vimiGoal | 50 | Company Settings > vimiGoal |
| "Median vimiGoal Requirement (%)" | Bonus reward threshold for vimiGoal | 80 | Company Settings > vimiGoal |
| "Allow staff and Manager to update Display Name" | Staff can edit their own display name | Off | Company Settings > General |
| "Notify everyone when someone receives a diamond..." | Company-wide notification on public diamond awards | Off | Company Settings > General |
| "Determine employee calendar view" | Scope of leave calendar visibility | Department Only | Company Settings > General |
| "Company Sales Target" | Company-wide sales target for vimiSales reports | - | Company Settings > vimiSales |
| "vimiBank A Release Date" / "vimiBank B Release Date" | Day of month payouts run | 1 / 15 | Company Settings > vimiBank |
| "Monthly Fund Budget" | Total monthly EWF budget (RM) | 0 | Company Settings > EWF |
| "Application Title" | Browser tab / app header text | vimigo | White Label Set |
| "Main Color" | App theme hex color | vimigo default | White Label Set |
| "Language" | App default language | English | Edit Company |
For the full catalogue of every setting key, see the internal reference material - this guide covers the ones most customers touch.
FAQ
Q: I updated the vision and mission but employees still see the old text.
A: Profile data is cached when a user logs in. Ask them to log out and log back in, or close and reopen the mobile app.
Q: I enabled a module but some employees can't see it in their menu.
A: The module is probably scoped to specific departments. Go to "Module Control", find the module, and check the "Department" list - add missing departments or switch to "All Departments".
Q: Where do I change the app currency to RM?
A: vimigo uses configurable number-format prefixes rather than a currency selector. Ask vimigo support to set "RM " as the prefix and "." as the decimal separator for your sales figures.
Q: My Bifrost webhook isn't firing. What should I check?
A: Three things, in order. (1) Is "Bifrost Integrations" on in Module Control? (2) Is the Bifrost Action "Status" set to Active? (3) Does the Trigger match the exact event (e.g. goal_completed, not goal_complete)?
Q: White-label looks correct in the admin panel but wrong in the employee app.
A: White-label assets load on app startup. Have employees force-refresh (web) or close and reopen (mobile). Also verify the uploaded image URLs are publicly reachable.
Q: The onboarding checklist on the dashboard won't disappear.
A: Click "Don't Show Again" on the checklist widget. If the link is missing, complete each step (Complete Company Profile, Invite Team, Configure Modules, Set First Goal) and it will clear automatically.
Q: The vimiGoal percentage fields are greyed out.
A: They're locked when module_advance and module_goal_advance are off. Enable both in Module Control, and make sure your account has the "Update Commission Settings" permission (see Roles & Permissions).
Q: Check-in times are off by a few hours.
A: Timezone is configured in Working Days, not in Company. Edit the working time schedule and set the correct "Timezone".
Related Guides
- Users - add people before they can do anything in the product
- Departments - organize your people into teams
- Roles & Permissions - control who can change Company settings
- Holidays - calendar of non-working dates that affects leave, goals, and attendance
- Working Days - weekly schedule template that decides expected clock-ins